2

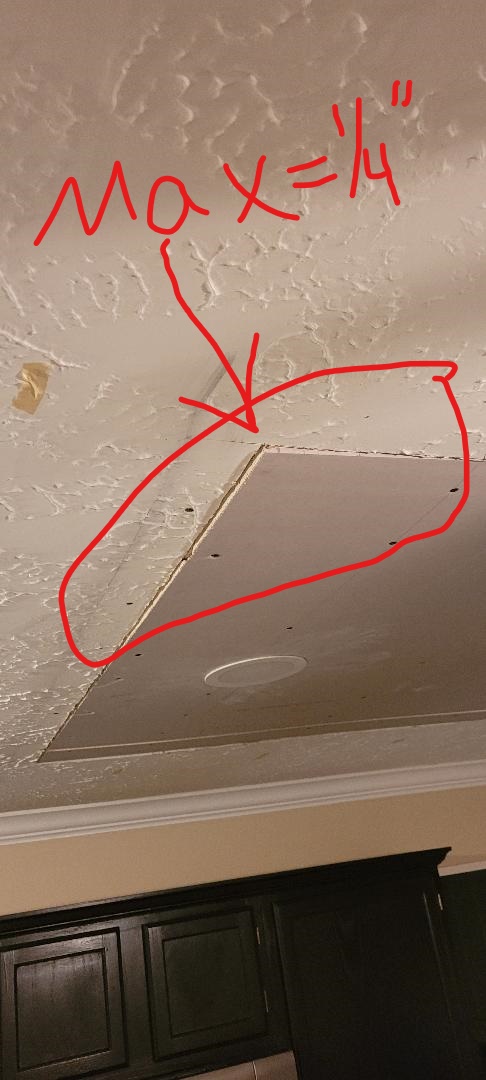
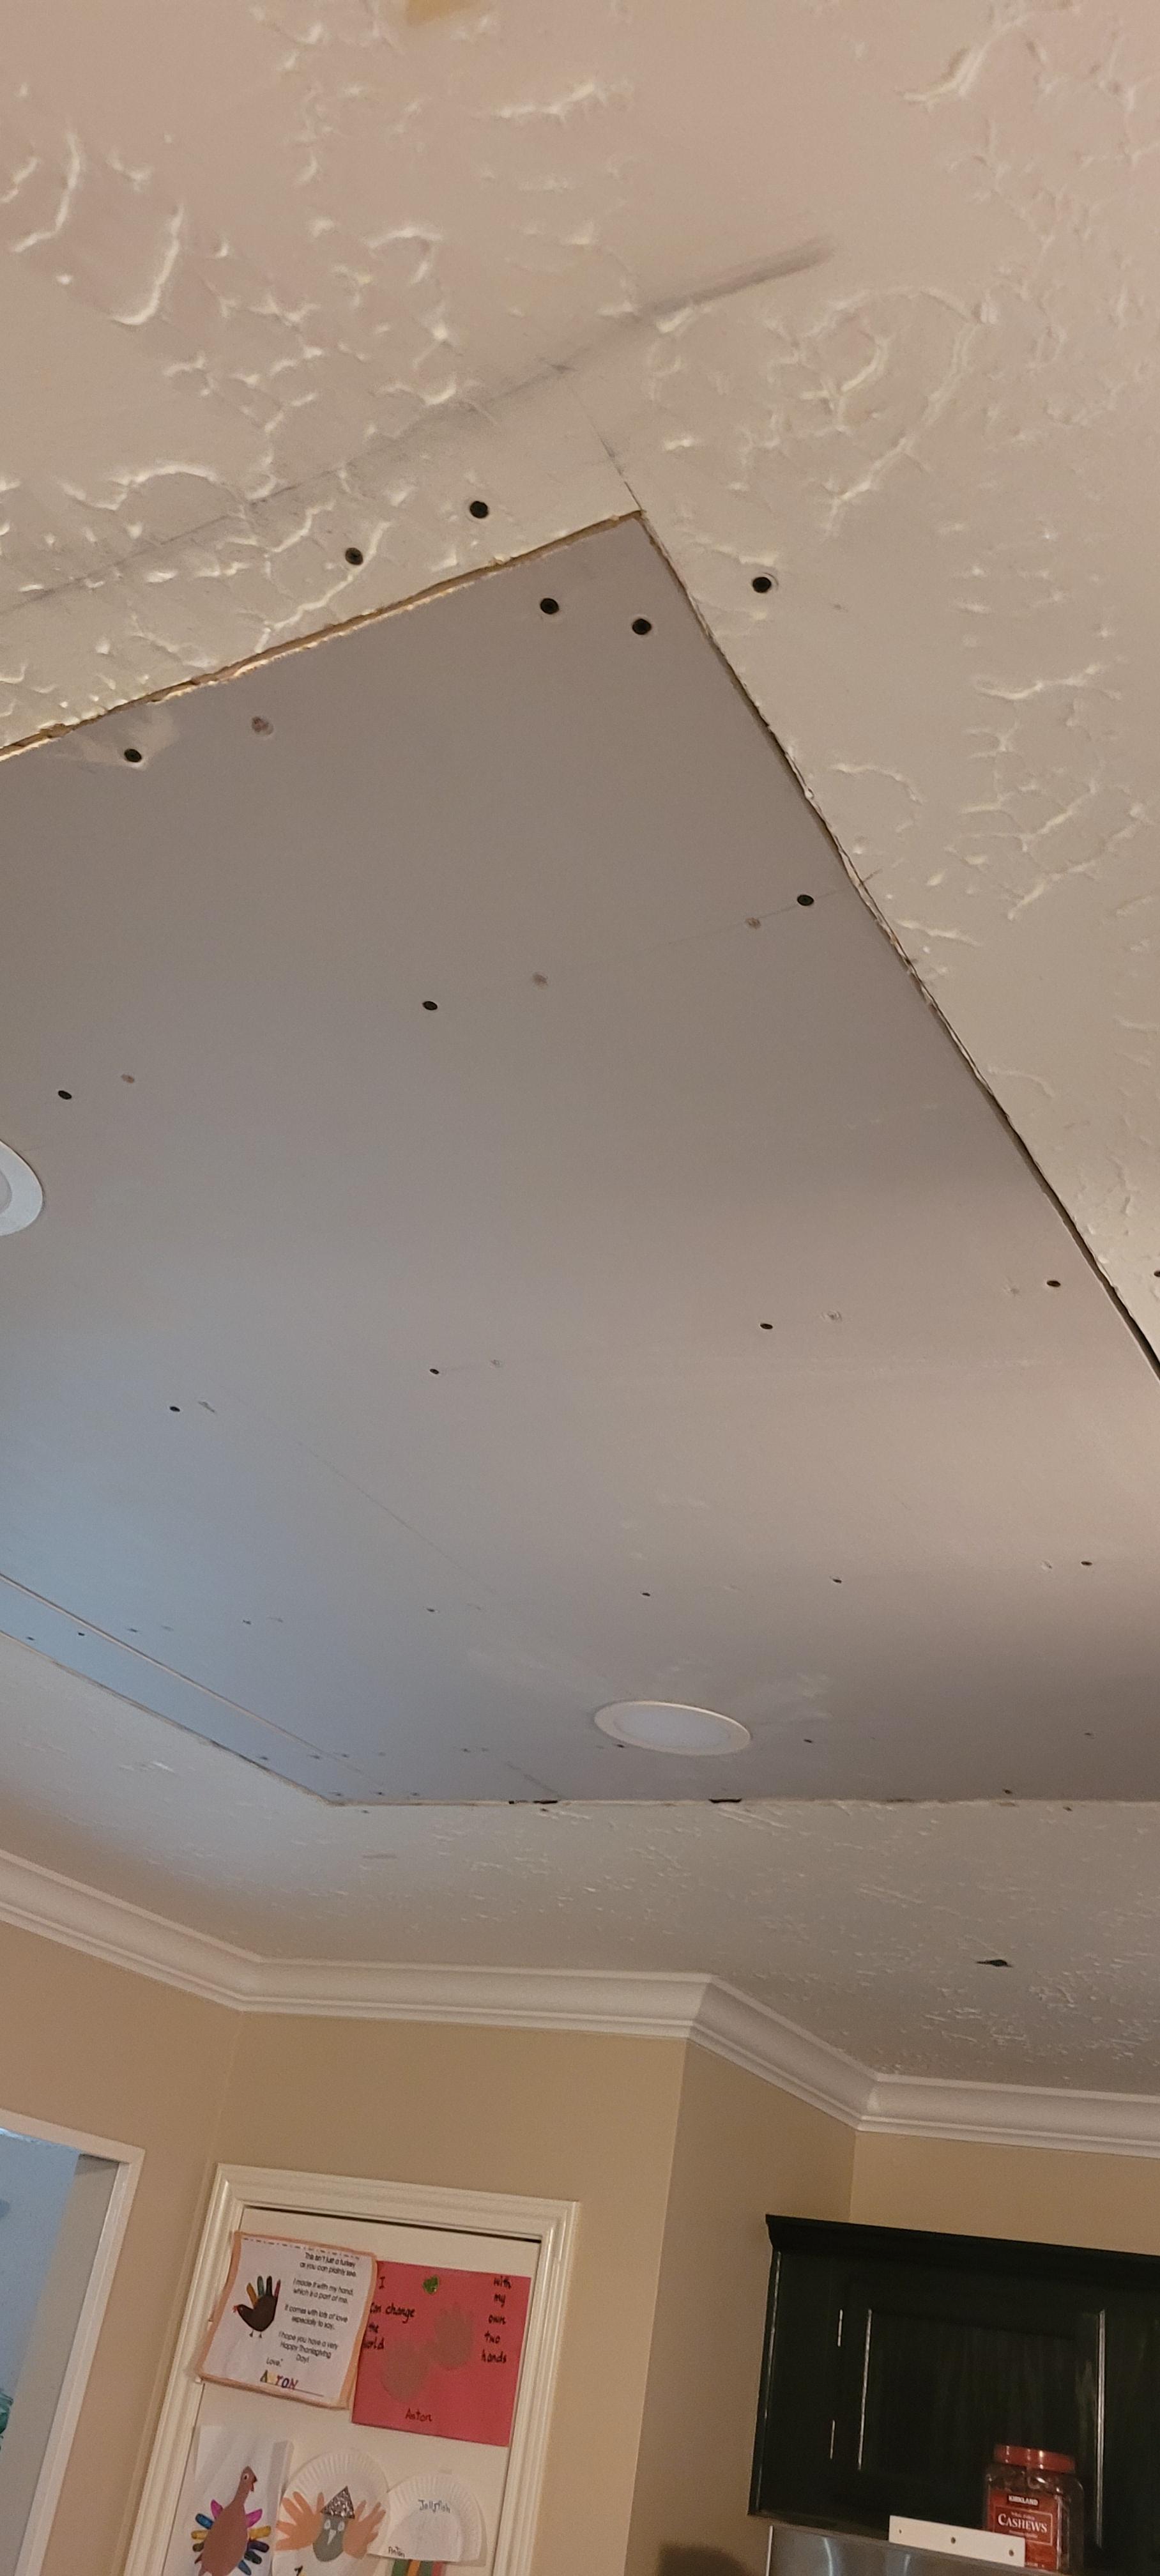
I removed and replaced an approximately 5'x6' drywall piece in the ceiling. On the butt joints, I used some OSB backer board to join them between floor joists. I knew this might be a problem, specifically with how low the joist block is to it (see previous question: Within code, can I notch a joist block?).

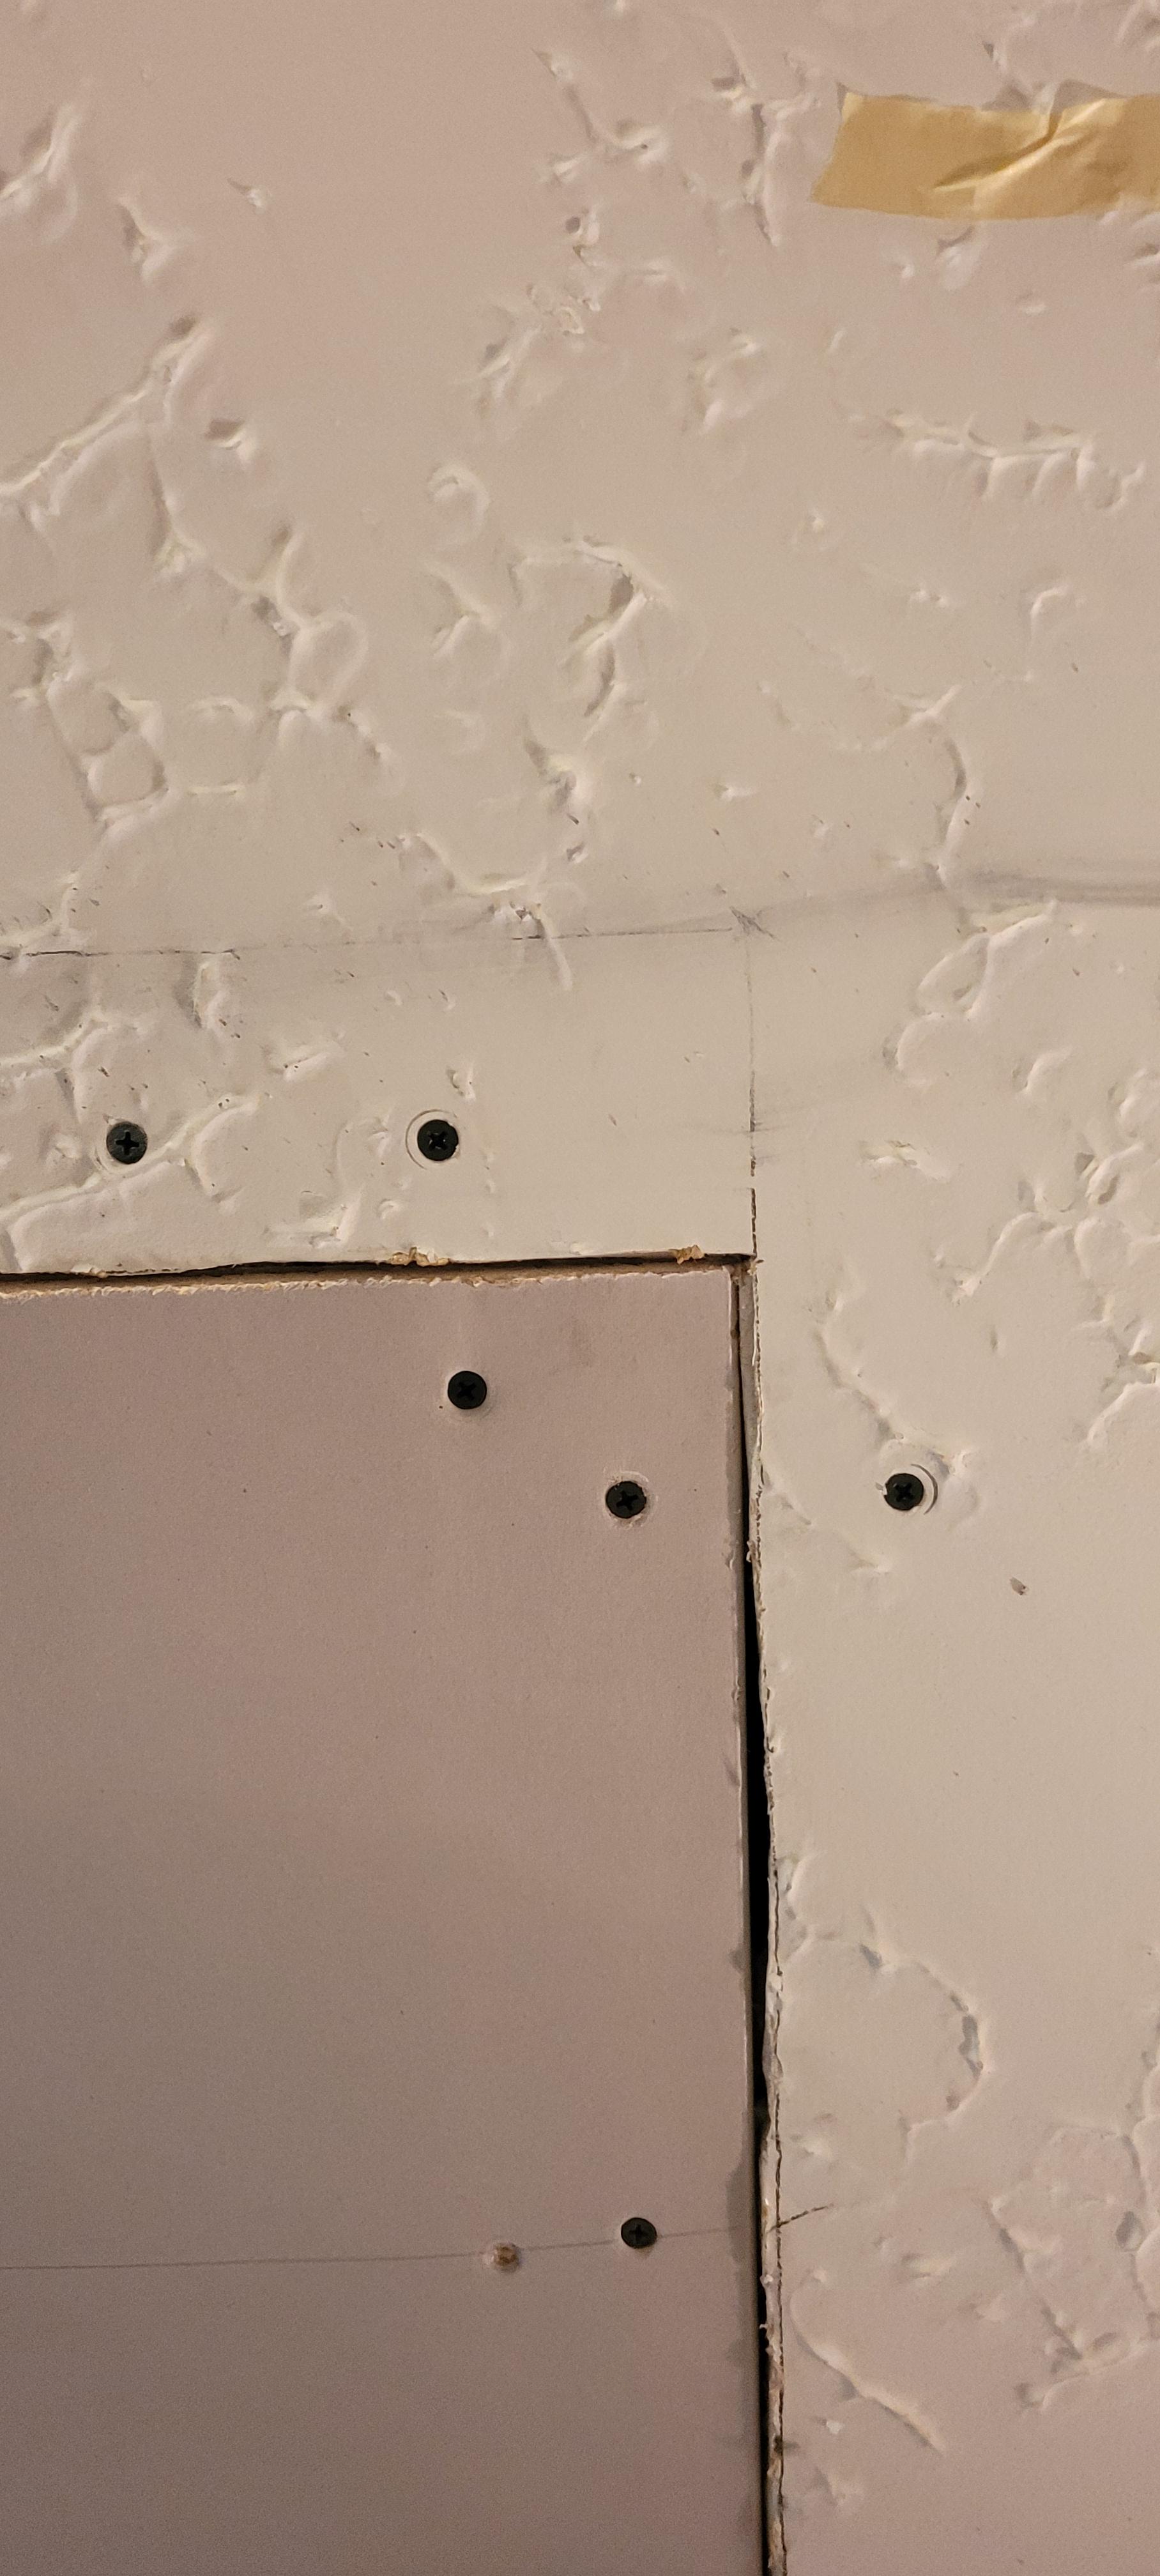
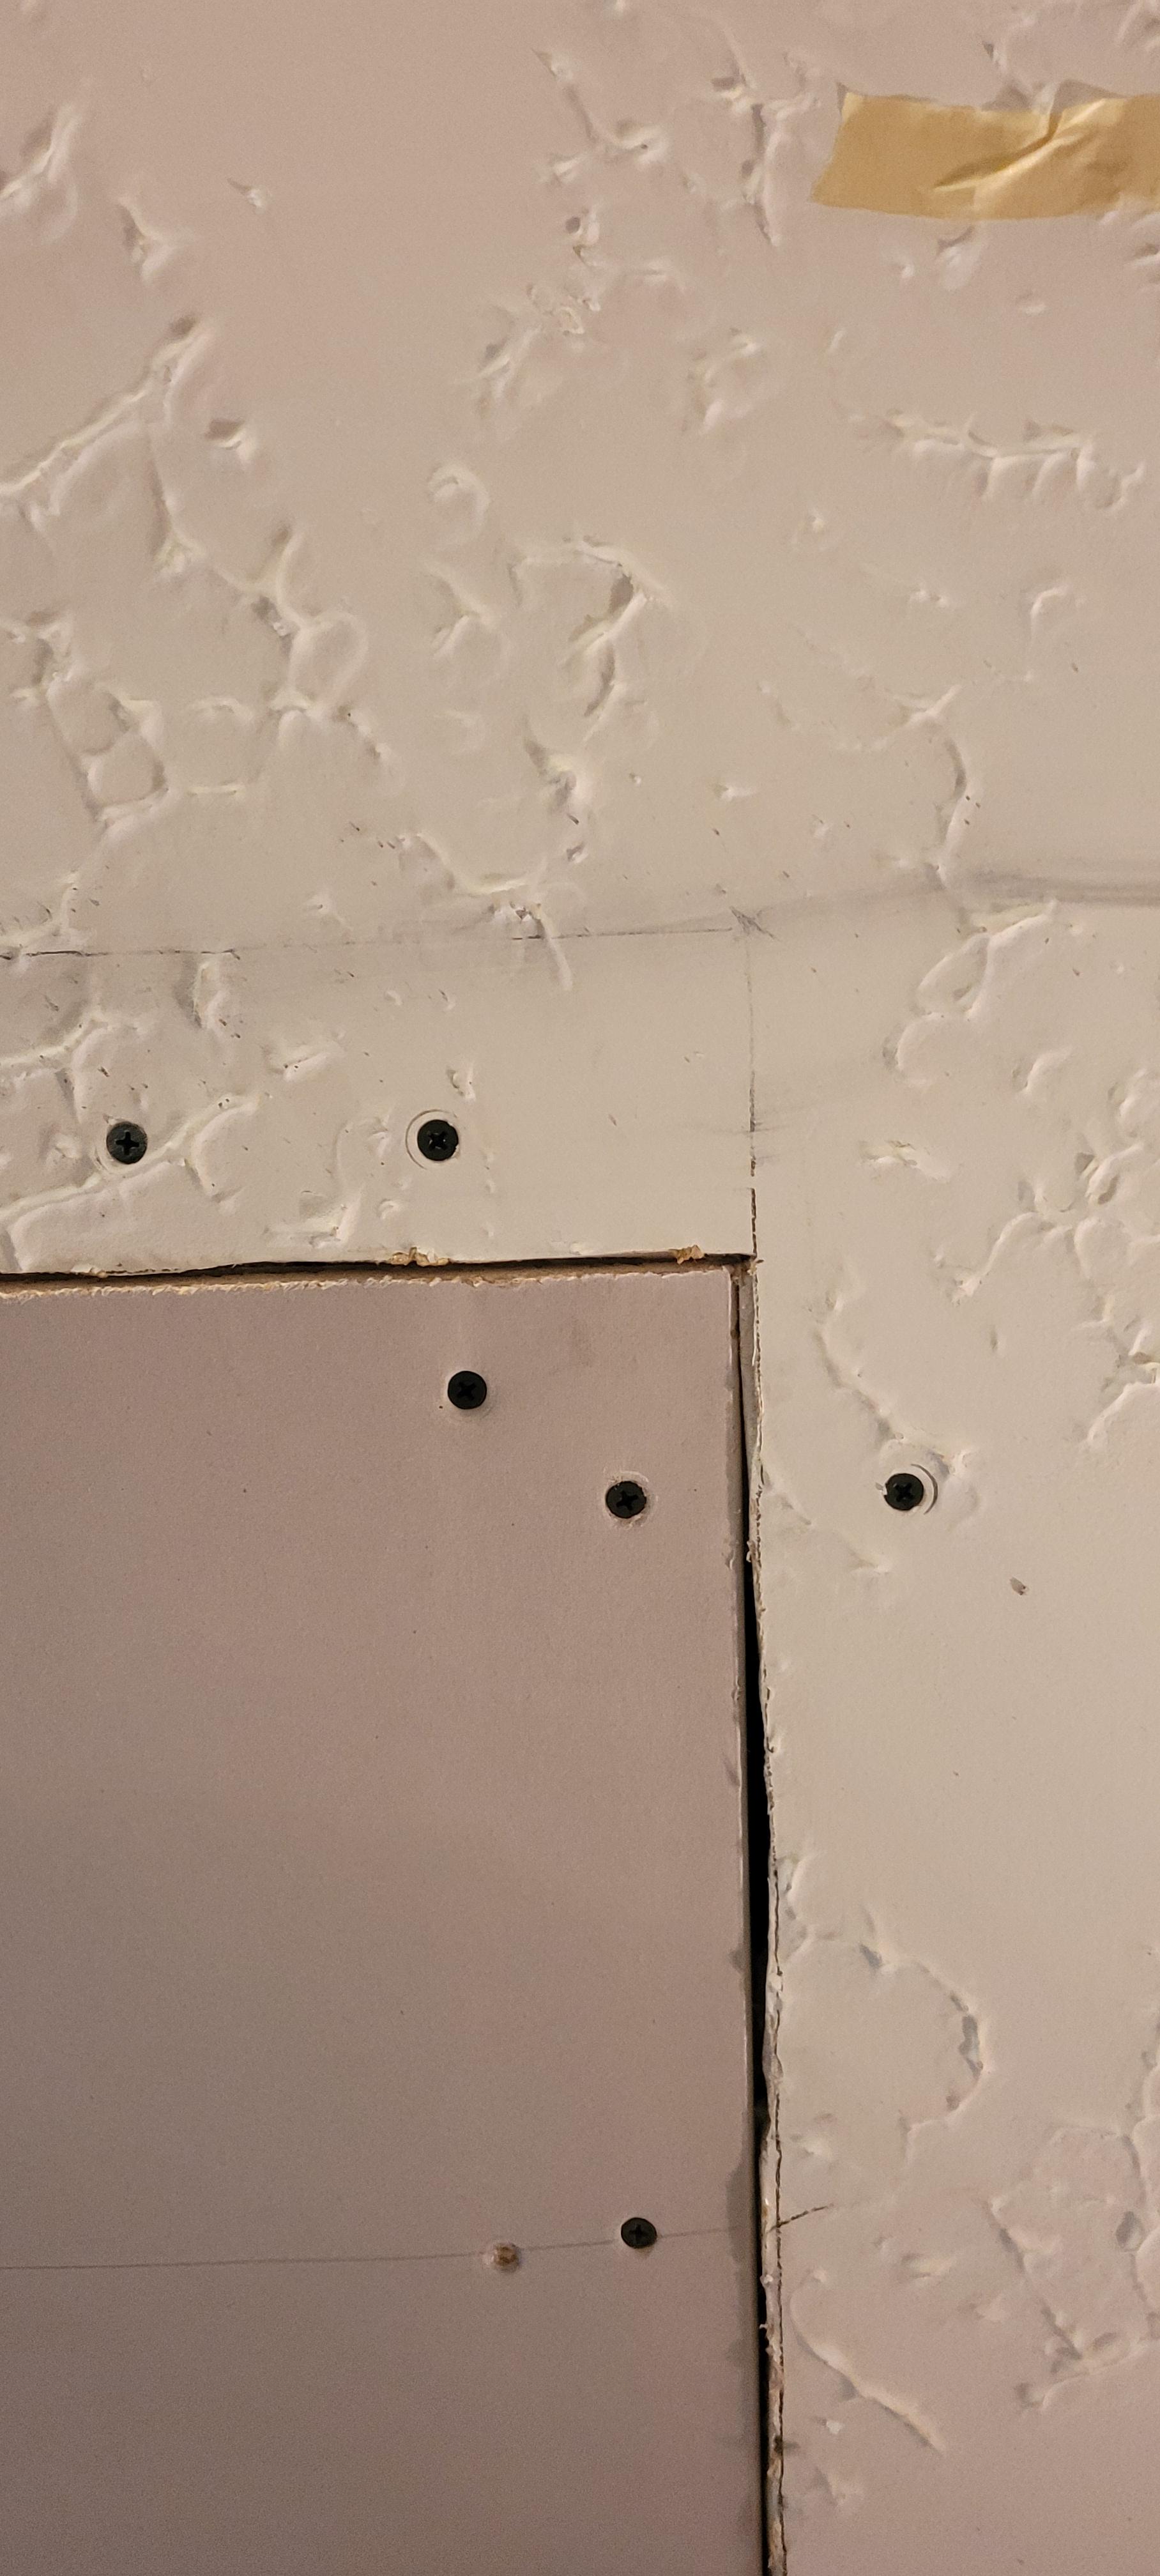
I hung a piece, then tried tightening down on the "high" (where the new drywall replacement piece drops below the existing piece) and ended up crumbling the repair piece in a few spots. I unscrewed it all and removed the piece, cut a new piece and reinstalled. It looks a little better but in one corner next to the problem area with the joist block, the butt joint can't "suck up" anymore due to the block there. I can slightly push near the high corner on the new drywall but it feels like it's stressing too much and that a screw (instead of the surface area of my palm) would cause it to crumble. This is only an issue in this one corner as all other joints are either recessed or flush so after multiple hot mud and finishing mud it'll be easier to handle.

The max overhand is 1/4" and after some quick searching I found a post that said it can be smoothed out with mudding but it may take several feet. Will it take "feet" to spread a 1/4" join to look flat??? Obviously, I want to minimize feathering multiple feet and retexture.

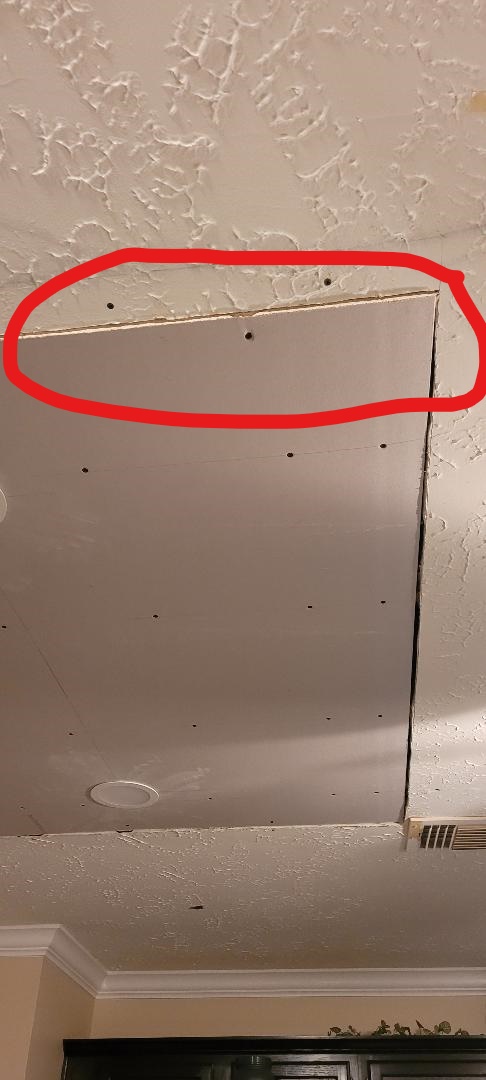
enter image description here enter image description here

1
  • 1
    You can feather 1/4" out if you go wide enough, but that sort of ridge becomes very noticeable if you have shallow-angle side lighting, such as from a nearby window. It's worth pulling the sheet down and fixing the backing, in my opinion.
    – isherwood
    Commented May 19, 2021 at 12:47

3 Answers 3

4

Below is the answer... But to fix this properly you have to take down that piece of drywall and give us pictures. Whatever is behind there is the issue. You short-cutted this install and left yourself with way more work than it should be. You have not installed proper backing for this piece or adjoining pieces. Now you want short-cuts for your short-cut when taking this piece down and putting backing is 30-45 minutes + scrapwood - NOT OSB! Also take a look at my last point (about the texture), as this should be addressed before you install this piece.

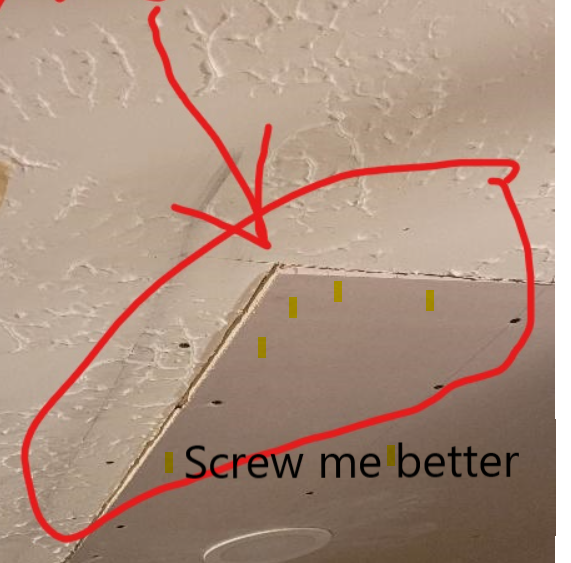
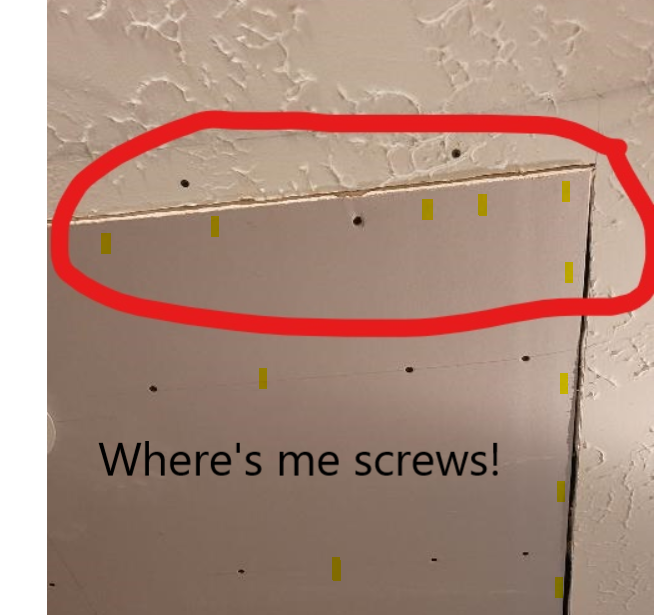
The protrusion or dip in the ceiling is not what concerns me. The issue is you have no screws in your corners and that your screw schedule is rather random.

Your corners have to be screwed in. Nothing to screw it in... then put wood up there to make it happen. This is not negotiable as all of your work will turn to cracks if these corners aren't secure.

enter image description here

If the drywall next to it is missing backing now you need to fix that too. You cannot float two pieces of drywall next to each other in a ceiling.

The depth issue is due to the lack of backing and bad screw schedule. Once you fix that, sure it won't be perfect but won't be as bad either.

enter image description here

The other big issue, you are not duplicating that texture and that texture will make it hard to mud/tape the seams. This is a much bigger issue than your drywall sticking out.

4
  • 1
    Your comment about the texture is what first came to mind for me as well. OP is going to need to knock off that texture for a foot or so from the joints to be able to mud this, even if the patch fit perfectly. Commented May 19, 2021 at 18:03
  • Yeah, the texture is a pain to work with. I've matched it before when opening up the ceiling to pull speaker wires. I know I need to wet sand/scrape/sand a good 6"-12" all around but am trying to get the drywall as close to flush as possible. It's 1/2" thick and screws are no more than 12 inches apart. The butt joint isn't floating, There is OSB board behind both pieces that each are screwed into. I'll try to add more screws to the corners. Worst case scenario, screws crack the drywall and I end up needing to replace it, at which point I'll shave down the joist blocker that's protruding.
    – habrockc
    Commented May 19, 2021 at 22:52
  • You basically need 2x4 around the entire edges to attach this to. Be great if the 2x4 spanned to attach your cut out piece plus the edge of the piece next to it. If the edge of the next piece is not screwed in it will move and the lack of screws on yours is just asking for cracking. Take it out and add these pieces in. It will ensure that your drywall is more even.
    – DMoore
    Commented May 19, 2021 at 22:56
  • As I continue inspecting, I think I'm going to have to pull it down again. I'll shave the joist backer down, which should allow me to place a backer board similar to what I did on the same side for only 2.5 of the 4 ft (hence the droopiness on the non-backed adjoining piece to existing ceiling). I'll do so on the other side too to reinforce the mud job (currently, flush-ness is okay but it's not connected because an air duct is directly above where I'd put the backer board and I wanted to avoid screwing into it with my 1.25" screws prodtruding beyond the 0.5" drywall + 0.5" OSB backer board.
    – habrockc
    Commented May 20, 2021 at 2:41
2

If there is some of your OSB backer behind the part that sticks out, you could remove that bit, or notch it out.

You could also use thinner drywall.

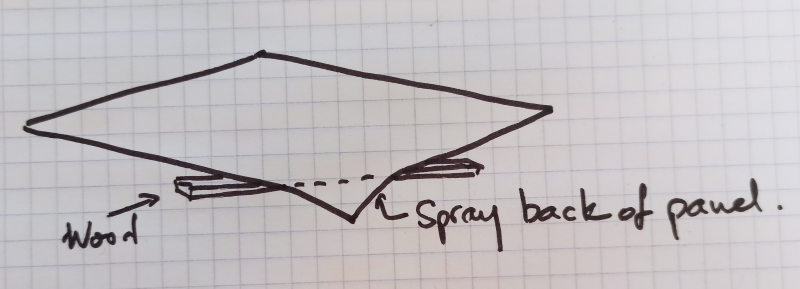
If there is no joist behind the part that sticks out, you could simply bend the piece of drywall before installing it, so you don't have to force it into the shape with screws.

So, how to bend drywall:

Mark the corner to bend with a pencil.

On a table, or on the floor, set some pieces of wood to rest the drywall on. The part you want to bend should be unsupported, and the rest should be supported.

Spray some water on the back of the drywall, and lay it down front face up.

Put a small weight on the corner, for example a soda can.

The water will soften the back of the drywall, and it will bend over maybe half an hour. Don't force it or it will break.

enter image description here

Note, in order to curve some drywall, you have to spray the inside of the bend, not the outside. If you spray the outside of the bend, which will be in tension when it bends, the cardboard will soften and crack under the tension. If you spray the inside of the bend, the cardboard and plaster will soften a bit, allowing it to compress, and it will bend.

Example: that's my window. The edge is a strip of drywall bent on a round form with a bit of sprayed water.

enter image description here

4
  • The Art of Bending Drywall. Nice tip!
    – P2000
    Commented May 19, 2021 at 14:40
  • 1
    Hehe, thanks. When it's on the ceiling, that solution puts a lot less drywall dust in your face than sanding off the bit that sticks out. I hate sanding ceilings.
    – bobflux
    Commented May 19, 2021 at 15:01
  • OSB is not a suitable backing material for drywall, especially ceilings. I think you are jumping the gun on the curving the drywall. The drywall probably doesn't need that and you are compounding a bad install.
    – DMoore
    Commented May 19, 2021 at 17:52
  • Why is OSB not suitable?
    – bobflux
    Commented May 19, 2021 at 18:22
2

If your palm can align it, then screws can too. Since it's a 1/4in protrusion and not an indentation, I'd try to reduce the unevenness first.

You can try by applying a piece of backing and some screws every inch or two, carefully inserting them to evenly distribute the pressure. When tightening and sinking the screws, take turns sinking all screws only a bit at a time. All those screw heads are easily covered during mudding.

The alternative is to trim/shave the blocking that's causing the problem in the first place. That would be the preferred solution: ensuring first that the backing and support are all even.

EDIT pics added: enter image description here

enter image description hereenter image description here

Your Answer

By clicking “Post Your Answer”, you agree to our terms of service and acknowledge you have read our privacy policy.

Not the answer you're looking for? Browse other questions tagged or ask your own question.